Back to Safety Center Main Menu
Secure Chat
The Secure Chat feature allows you to communicate with other plan users securely, in real time, directly from the app. *Note: If you do not see the "Secure Chat" feature, please contact Client Services to have this feature enabled.
Adding a Secure Chat to your Plan
Secure Chats are set up as an event within your plan. You can create multiple secure chats within the same plan, if needed. Any user who has access to the plan will have access to the secure chat event(s). If you would like to limit the users who have access to the chat, you may want to create a plan specifically for this feature and only grant access to those users who should have access to the chat.
- You will first need to access the plan to which you want to add a shared checklist. Click on the Plans tab and select My Plans.
- Click Edit beside the appropriate plan.
- Click on the Event tab, then select Event Sequence.
- Click Add Event.
- Click Edit beside the newly created event.
- Click Edit on the Event Information page.
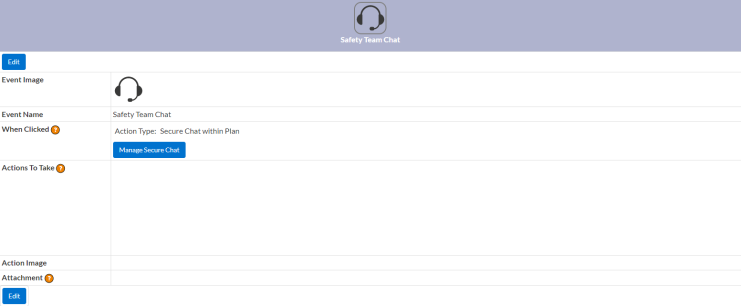
- Choose an icon, and rename the event. You may find it helpful to identify the event with a clear title, such as Safety Team Chat.
- Delete any text in the Actions to Take section. *Note: Do not add any other information (Actions to Take, Contacts, Attachments, or Reports/Forms) to this event.
- In the When Clicked section, open the Action to Perform drop down menu and select Secured Chat within Plan.
- Click Update.
Notification Settings
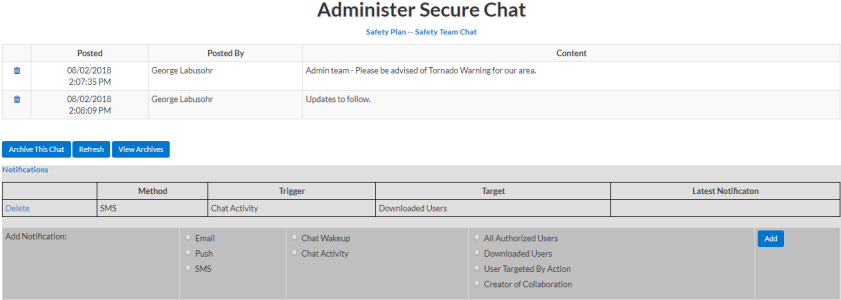
Each secure chat within a plan can have it's own notification configuration. This configuration allows you to customize what triggers a notification, who receives the notification, and how the notification goes out.
- Click on the Collaboration tab.
- Select Secure Chat. This page will show you all secure chat events within your plans across your organizational level. *Note: If there are any secure chats that were created at a sub-organizational level, they will need to be configured at that level.
- Click Select next to the secure chat whose notifications you need to configure.
- Multiple notifications can be set up for one chat. For each notification:
- Select the Method of communication.
- Choose the Trigger for the notification.
- Decide who the Target audience is for the notification.
- Click Add.
Publish the Plan
After you have updated the plan to include the secure chat event and you have configured notification settings, publish the plan as you normally would.
